点击返回Arduino显示屏页面
OLED 屏幕应用
前言
相信在您的创客路上, 有许多项目需要进行图像化人机界面进行显示文本或图形, 一直以来LED和LCD是传统选择, 但近些年来, 有一种显示器越来越流行—-OLED
OLED应用于各种大小显示需求, 大到电视屏幕, 小到微型智能穿戴设备的显示器都是它的用武之地. 在各种照明条件下它都能熠熠生辉, 且消耗的电流很小! OLED相对于LCD等有着极大的优势
OLED是一种利用多层有机薄膜结构产生电致发光的器件,它很容易制作,而且只需要低的驱动电压,这些主要的特征使得OLED在满足平面显示器的应用上显得非常突出。OLED显示屏比LCD更轻薄、亮度高、功耗低、响应快、清晰度高、柔性好、发光效率高,能满足消费者对显示技术的新需求。全球越来越多的显示器厂家纷纷投入研发,大大的推动了OLED的产业化进程。(资料来源于百度百科)
以上介绍了OLED的优势, 相信大家都对如何使用Arduino去控制OLED显示比较好奇, 因此本篇将对Arduino如何控制OLED展开说明,以创客朋友们常用的OLED 0.96 IIC 128×64模块进行实例应用讲解其他尺寸的OLED可参考本教程进行学习和开发
模块介绍
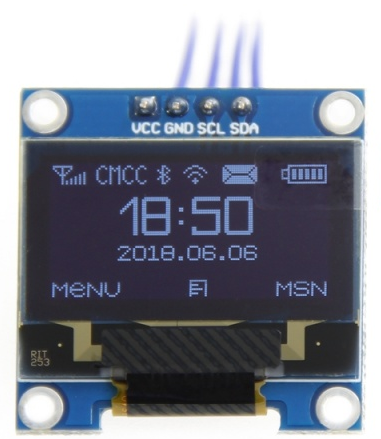
首先对OLED 0.96 IIC 128x64模块里的几个参数进行说明, 0.96指的是屏幕的显示尺寸0.96inch, 128×64指的是屏幕的分辨率为128×64, 而IIC指的是该模块使用IIC协议进行通讯, (关于Arduino-IIC协议可参考Arduino-Wire)
以下是OLED 0.96 12864屏幕的基本介绍
- 高分辨率:128×64(和12864同分辨率,高PPI)
- 超大可视角度:大于160°(显示屏中可视角度最大的一种屏幕)
- 超低功耗:正常显示0.06w(远低于TFT显示屏)
- 宽电压供电(3V~5V),兼容3.3V和5V电平逻辑,无需电平转换芯片
- IIC接口只需2个IO轻松点亮
- 工作温度范围为工业级(-20℃~70℃)
- 军工级工艺标准,长期稳定工作
- 提供丰富的多平台例程,提供底层驱动技术支持
- 黄蓝、白、蓝三种颜色显示方案可选
模块参数
| 名称 | 颜色分类 | ||
|---|---|---|---|
| 显示颜色 | 白色 | 蓝色 | 黄蓝双色 |
| SKU | MC096GW | MC096GB | MC096GY |
| 尺寸 | 0.96(inch) | ||
| 类型 | OLED | ||
| OLED驱动芯片 | SSD1306 | ||
| 分辨率 | 128*64 (Pixel) | ||
| 模块接口 | IIC,①-GND,②-VCC,③-SCL,④-SDA | ||
| 有效显示区域 | 21.744×10.864(mm) | ||
| 模块尺寸 | 27.3×27.8(mm) | ||
| 视角 | >160° | ||
| 工作温度 | -20℃~70℃ | ||
| 存储温度 | -30℃~80℃ | ||
| 工作电压 | 3.3V / 5V | ||
| 功耗 | 全亮约为25mA,全灭约为1.5mA。 | ||
| 产品重量 | 15(g) |
模块尺寸
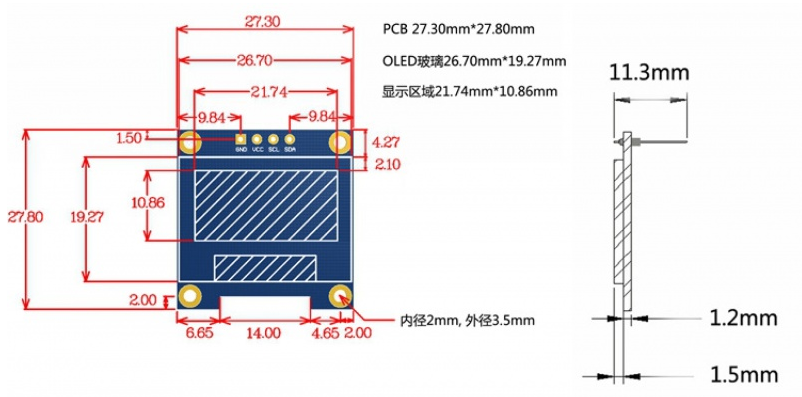
为了方便更多创客朋友们开发自己的OLED创客作品, 以下提供OLED0.96的模块尺寸图供大家参考
资料来源于lcdwiki-OLED0.96
接口定义
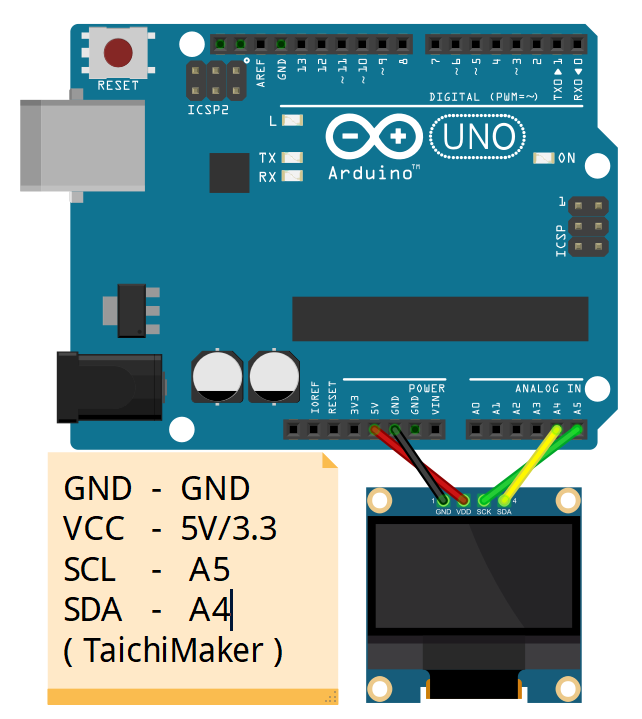
OLED0.96 IIC模块使用IIC通信接口,只需要接4根线就可以完成OLED屏数据通信
- VCC:电源正极(接5V电源)
- GND:电源负极(接地)
- SCL:IIC时钟信号线
- SDA:IIC数据信号线
VCC接到开发板的5V电源引脚上,GND接到开发板GND引脚上,SCL和SDA需要根据不同的开发板引脚定义来接线(可参考Arduino-Wire)
该OLED模块的IIC地址为0x3C
Arduino控制OLED
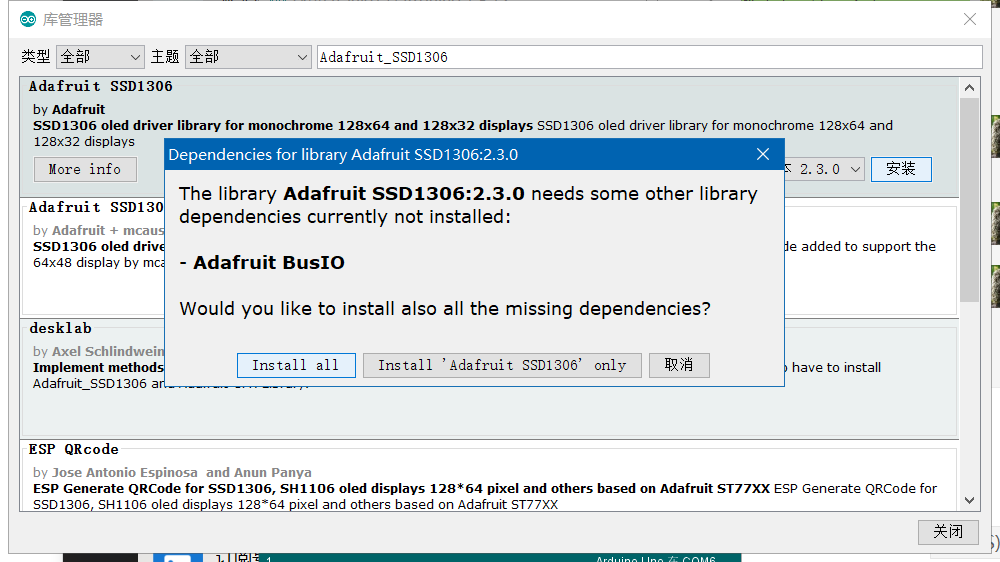
我们使用Adafruit_SSD1306库来更加快捷高效的实现Arduino控制OLED, 在使用这个库时,需要依赖Adafruit-GFX-Library库才能使其正常工作,因此您需要在您的ArduinoIDE同时安装这两个库, 此外您可以通过Arduino自带的库管理器来安装,在安装时,如果出现以下情况, 点击Install all即可,这是Adafruit-GFX-Library的依赖
Arduino使用硬件IIC,芯片内部已经对IIC引脚做了定义,因此软件上不需要再对IIC引脚进行定义,只是不同型号的单片机,IIC引脚定义不一样,需要在接线上根据开发板做调整。
我们将以控制OLED 0.96 I2C 屏幕为例子进行说明。无论你手里的OLED 0.96是单色的还是双色的都没关系, 这些显示器都是基于SSD1306 OLED驱动芯片,因此它们都可以使用Adafruit_SSD1306库来控制显示。
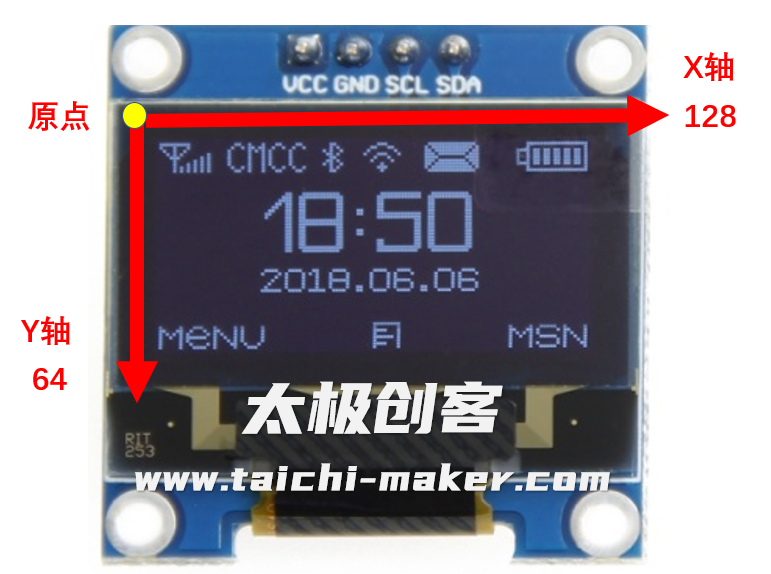
在开始之前,请大家在屏幕建立一个坐标系的概念,因为在程序里,位置都是以坐标的形式去定位的,以OLED 0.96 128X64为例,面向屏幕,以屏幕左上角为坐标原点,横向向右是X轴,竖向向下是Y轴
1 OLED显示文字
电路连接
示例程序
|
1 2 3 4 5 6 7 8 9 10 11 12 13 14 15 16 17 18 19 20 21 22 23 24 25 26 27 28 29 30 31 32 33 34 35 36 37 38 39 40 41 42 43 44 45 46 47 48 49 50 51 52 53 54 55 56 57 58 59 60 61 62 63 64 65 66 67 68 69 70 |
/********************************************************************** 程序名称/Program name : words_display 团队/Team : 太极创客团队 / Taichi-Maker (www.taichi-maker.com) 作者/Author : Dapenson 日期/Date(YYYYMMDD) : 2020/07/01 程序目的/Purpose : 使用OLED0.96 IIC 12864显示文字 ----------------------------------------------------------------------- 修订历史/Revision History 日期/Date 作者/Author 参考号/Ref 修订说明/Revision Description ----------------------------------------------------------------------- 其它说明: ***********************************************************************/ // 引入IIC通讯所需的Wire库文件 // 教程参考http://www.taichi-maker.com/homepage/reference-index/arduino-library-index/wire-library/ #include <Wire.h> // 引入驱动OLED0.96所需的库 #include <Adafruit_GFX.h> #include <Adafruit_SSD1306.h> #define SCREEN_WIDTH 128 // 设置OLED宽度,单位:像素 #define SCREEN_HEIGHT 64 // 设置OLED高度,单位:像素 // 自定义重置引脚,虽然教程未使用,但却是Adafruit_SSD1306库文件所必需的 #define OLED_RESET 4 Adafruit_SSD1306 display(SCREEN_WIDTH, SCREEN_HEIGHT, &Wire, OLED_RESET); void setup() { // 初始化Wire库 // Wire.begin(); // 初始化OLED并设置其IIC地址为 0x3C display.begin(SSD1306_SWITCHCAPVCC, 0x3C); } void loop() { words_display(); display.display(); } void words_display() { // 清除屏幕 display.clearDisplay(); // 设置字体颜色,白色可见 display.setTextColor(WHITE); //设置字体大小 display.setTextSize(1.5); //设置光标位置 display.setCursor(0, 0); display.print("TaichiMaker"); display.setCursor(0, 20); display.print("time: "); //打印自开发板重置以来的秒数: display.print(millis() / 1000); display.print(" s"); display.setCursor(0, 40); display.print("Author: "); display.print("Dapenson"); } |
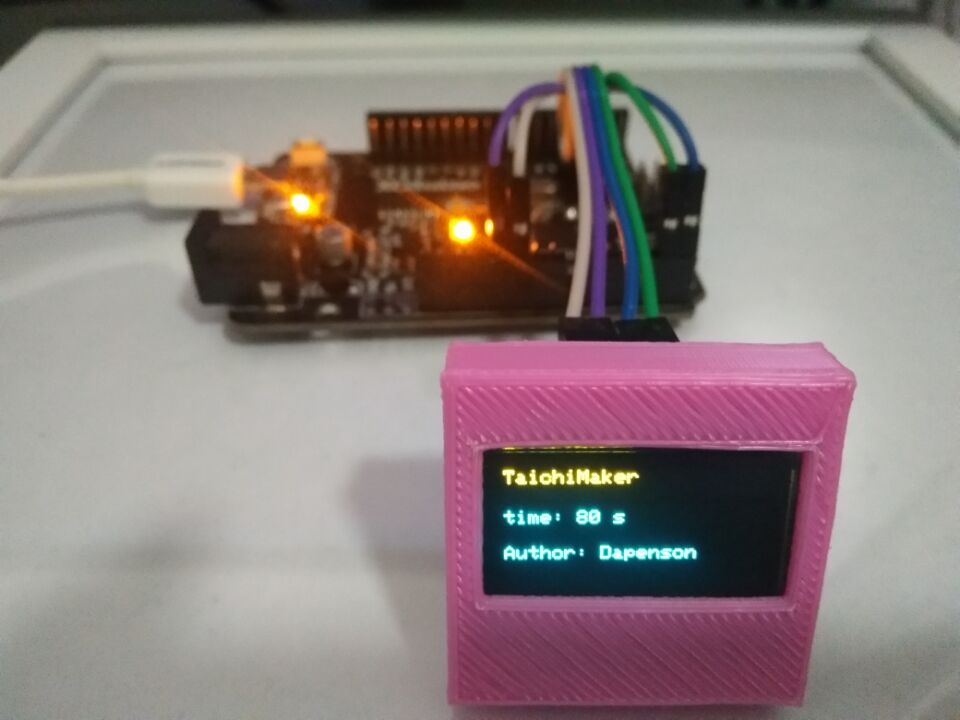
效果演示
2 OLED显示汉字
汉字的显示需要对文字进行取模操作,紧接着使用drawBitmap()函数对取模生成的数组进行显示
汉字取模
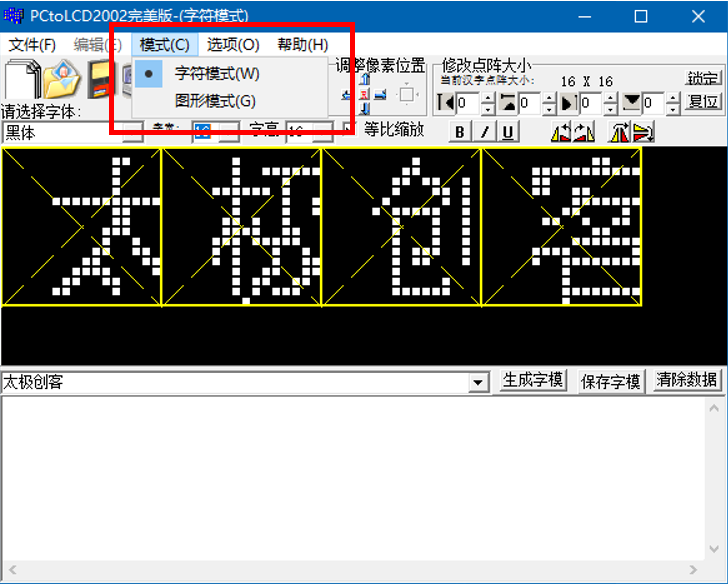
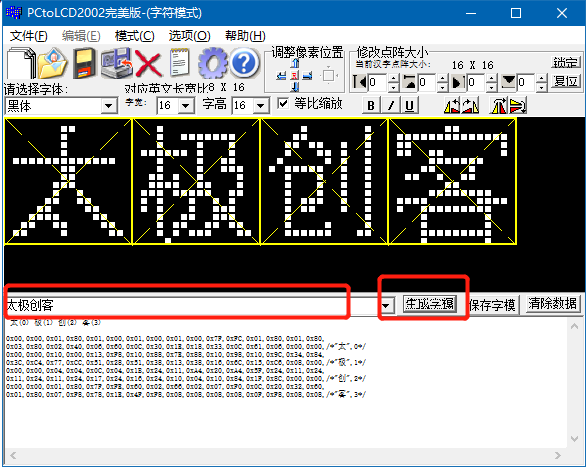
1 打开取模软件,切换到字符模式
2 在菜单栏区设置字体和尺寸选择
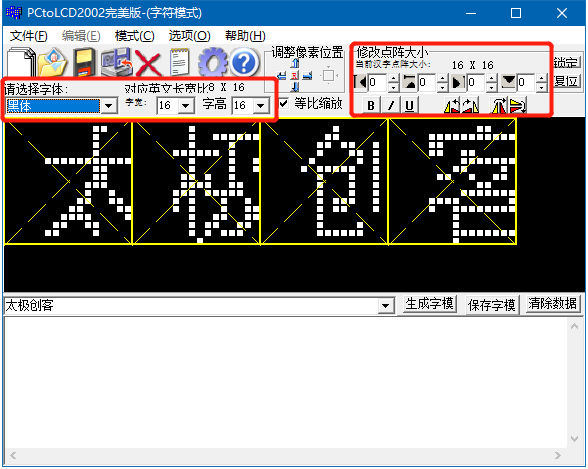
3 字模选项设置,设置之后点击确定按钮
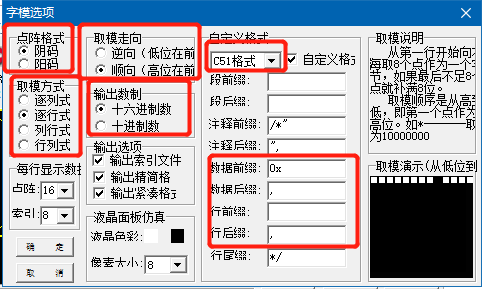
4 输入字符,点击生成子模, 生成之后需要对生成的数据进行变量赋值和加工,具体格式参考示例程序
电路连接

示例程序
hans_display.ino
|
1 2 3 4 5 6 7 8 9 10 11 12 13 14 15 16 17 18 19 20 21 22 23 24 25 26 27 28 29 30 31 32 33 34 35 36 37 38 39 40 41 42 43 44 45 46 47 48 49 50 51 52 53 54 55 56 57 58 59 60 61 62 63 64 65 66 67 68 69 70 71 72 73 74 75 |
/********************************************************************** 程序名称/Program name : hans_display 团队/Team : 太极创客团队 / Taichi-Maker (www.taichi-maker.com) 作者/Author : Dapenson 日期/Date(YYYYMMDD) : 2020/07/01 程序目的/Purpose : 使用OLED0.96 IIC 12864显示汉字 ----------------------------------------------------------------------- 修订历史/Revision History 日期/Date 作者/Author 参考号/Ref 修订说明/Revision Description ----------------------------------------------------------------------- 其它说明: ***********************************************************************/ // 引入IIC通讯所需的Wire库文件 // 教程参考http://www.taichi-maker.com/homepage/reference-index/arduino-library-index/wire-library/ #include <Wire.h> #include "text.h" // 引入驱动OLED0.96所需的库 #include <Adafruit_GFX.h> #include <Adafruit_SSD1306.h> #define SCREEN_WIDTH 128 // 设置OLED宽度,单位:像素 #define SCREEN_HEIGHT 64 // 设置OLED高度,单位:像素 // 自定义重置引脚,虽然教程未使用,但却是Adafruit_SSD1306库文件所必需的 #define OLED_RESET 4 Adafruit_SSD1306 display(SCREEN_WIDTH, SCREEN_HEIGHT, &Wire, OLED_RESET); void setup() { // 初始化OLED并设置其IIC地址为 0x3C display.begin(SSD1306_SWITCHCAPVCC, 0x3C); } void loop() { hans_display_0(); hans_display_1(); } void hans_display_0(void) { // 显示之前清屏 display.clearDisplay(); // 显示文字 (左上角x坐标,左上角y坐标, 图形数组, 图形宽度像素点, 图形高度像素点, 设置颜色) display.drawBitmap(20 * 1, 16, hans_tai, 16, 16, 1); display.drawBitmap(20 * 2, 16, hans_ji, 16, 16, 1); display.drawBitmap(20 * 3, 16, hans_chuang, 16, 16, 1); display.drawBitmap(20 * 4, 16, hans_ke, 16, 16, 1); //显示图形 display.display(); delay(2000); } void hans_display_1(void) { // 显示之前清屏 display.clearDisplay(); // 显示文字 (左上角x坐标,右上角y坐标, 图形数组, 图形宽度像素点, 图形高度像素点, 设置颜色) display.drawBitmap(20 * 1, 16, hans_tai1, 32, 32, 1); display.drawBitmap(20 * 2, 16, hans_ji1, 32, 32, 1); display.drawBitmap(20 * 3, 16, hans_chuang1, 32, 32, 1); display.drawBitmap(20 * 4, 16, hans_ke1, 32, 32, 1); //显示图形 display.display(); delay(2000); } |
text.h
|
1 2 3 4 5 6 7 8 9 10 11 12 13 14 15 16 17 18 19 20 21 22 23 24 25 26 27 28 29 30 31 32 33 34 35 36 37 38 39 40 41 42 43 44 45 46 47 48 49 50 51 52 53 54 55 56 57 58 59 60 61 |
static const unsigned char PROGMEM hans_tai[] = { 0x01, 0x00, 0x01, 0x00, 0x01, 0x00, 0x01, 0x00, 0x01, 0x00, 0xFF, 0xFE, 0x01, 0x00, 0x01, 0x00, 0x02, 0x80, 0x02, 0x80, 0x04, 0x40, 0x04, 0x40, 0x0A, 0x20, 0x11, 0x10, 0x21, 0x08, 0xC0, 0x06 /*"太",0*/ }; static const unsigned char PROGMEM hans_ji[] = { 0x10, 0x00, 0x13, 0xFC, 0x10, 0x84, 0x10, 0x88, 0xFC, 0x88, 0x10, 0x90, 0x30, 0x9C, 0x38, 0x84, 0x55, 0x44, 0x55, 0x44, 0x91, 0x28, 0x11, 0x28, 0x12, 0x10, 0x12, 0x28, 0x14, 0x44, 0x11, 0x82}; /*极",1*/ static const unsigned char PROGMEM hans_chuang[] = { 0x08, 0x04, 0x08, 0x04, 0x14, 0x04, 0x12, 0x24, 0x21, 0x24, 0x40, 0xA4, 0xBE, 0x24, 0x22, 0x24, 0x22, 0x24, 0x22, 0x24, 0x2A, 0x24, 0x24, 0x24, 0x20, 0x84, 0x20, 0x84, 0x1F, 0x94, 0x00, 0x08}; /*"创",2*/ static const unsigned char PROGMEM hans_ke[] = { 0x02, 0x00, 0x01, 0x00, 0x7F, 0xFE, 0x40, 0x02, 0x88, 0x04, 0x0F, 0xF0, 0x10, 0x20, 0x2C, 0x40, 0x03, 0x80, 0x1C, 0x70, 0xE0, 0x0E, 0x1F, 0xF0, 0x10, 0x10, 0x10, 0x10, 0x1F, 0xF0, 0x10, 0x10}; /*"客",3*/ static const unsigned char PROGMEM hans_tai1[] = { 0x00, 0x00, 0x00, 0x00, 0x00, 0x00, 0x00, 0x00, 0x00, 0x00, 0x00, 0x00, 0x00, 0x00, 0x00, 0x00, 0x00, 0x60, 0x00, 0x00, 0x00, 0x30, 0x00, 0x00, 0x00, 0x30, 0x00, 0x00, 0x00, 0x30, 0x00, 0x00, 0x00, 0x33, 0x00, 0x00, 0x00, 0x2F, 0x00, 0x00, 0x00, 0x3F, 0x80, 0x00, 0x00, 0x69, 0x00, 0x00, 0x02, 0xB0, 0x00, 0x00, 0x03, 0x60, 0x00, 0x00, 0x00, 0x60, 0x00, 0x00, 0x00, 0x51, 0x00, 0x00, 0x00, 0x59, 0x00, 0x00, 0x00, 0x8D, 0x00, 0x00, 0x00, 0x8F, 0x00, 0x00, 0x01, 0xA7, 0x00, 0x00, 0x01, 0x3B, 0x00, 0x00, 0x06, 0x3B, 0x80, 0x00, 0x00, 0x13, 0xC0, 0x00, 0x00, 0x01, 0xC0, 0x00, 0x00, 0x01, 0xE0, 0x00, 0x00, 0x00, 0xE0, 0x00, 0x00, 0x00, 0x40, 0x00, 0x00, 0x00, 0x00, 0x00, 0x00, 0x00, 0x00, 0x00, 0x00, 0x00, 0x00, 0x00, 0x00, 0x00, 0x00, 0x00, 0x00, 0x00, 0x00, 0x00}; /*"太",0*/ static const unsigned char PROGMEM hans_ji1[] = { 0x00, 0x00, 0x00, 0x00, 0x00, 0x00, 0x00, 0x00, 0x00, 0x00, 0x00, 0x00, 0x00, 0x00, 0x00, 0x00, 0x00, 0x00, 0x00, 0x00, 0x00, 0x40, 0x80, 0x00, 0x00, 0x41, 0x00, 0x00, 0x00, 0x63, 0x00, 0x00, 0x00, 0x66, 0x00, 0x00, 0x00, 0xCA, 0x00, 0x00, 0x01, 0xFA, 0xC0, 0x00, 0x02, 0xAD, 0xC0, 0x00, 0x0C, 0xD7, 0xC0, 0x00, 0x09, 0xD4, 0xC0, 0x00, 0x01, 0xD0, 0xC0, 0x00, 0x02, 0xD8, 0xC0, 0x00, 0x03, 0xE5, 0xC0, 0x00, 0x07, 0xA7, 0x80, 0x00, 0x05, 0xA3, 0x80, 0x00, 0x05, 0xB7, 0xA0, 0x00, 0x0D, 0xAF, 0xC0, 0x00, 0x00, 0xE7, 0xC0, 0x00, 0x00, 0x03, 0xE0, 0x00, 0x00, 0x02, 0x70, 0x00, 0x00, 0x00, 0x20, 0x00, 0x00, 0x00, 0x00, 0x00, 0x00, 0x00, 0x00, 0x00, 0x00, 0x00, 0x00, 0x00, 0x00, 0x00, 0x00, 0x00, 0x00, 0x00, 0x00, 0x00, 0x00, 0x00, 0x00, 0x00, 0x00, 0x00, 0x00, 0x00}; /*"极",1*/ static const unsigned char PROGMEM hans_chuang1[] = { 0x00, 0x00, 0x00, 0x00, 0x00, 0x00, 0x00, 0x00, 0x00, 0x00, 0x00, 0x00, 0x00, 0x00, 0x00, 0x00, 0x00, 0x60, 0x00, 0x00, 0x00, 0x20, 0x20, 0x00, 0x00, 0x60, 0x20, 0x00, 0x00, 0x60, 0x60, 0x00, 0x00, 0x40, 0x40, 0x00, 0x00, 0xD8, 0xC0, 0x00, 0x00, 0xB8, 0xC0, 0x00, 0x01, 0x61, 0x40, 0x00, 0x01, 0xD1, 0x40, 0x00, 0x02, 0x35, 0x40, 0x00, 0x02, 0x72, 0x40, 0x00, 0x04, 0xB2, 0x40, 0x00, 0x05, 0x36, 0x40, 0x00, 0x03, 0xB6, 0x40, 0x00, 0x00, 0xEC, 0x40, 0x00, 0x00, 0xEC, 0x40, 0x00, 0x00, 0xF4, 0x40, 0x00, 0x01, 0x34, 0x40, 0x00, 0x01, 0x70, 0xE0, 0x00, 0x01, 0xEF, 0xE0, 0x00, 0x01, 0xC1, 0xC0, 0x00, 0x00, 0x80, 0xC0, 0x00, 0x00, 0x00, 0x00, 0x00, 0x00, 0x00, 0x00, 0x00, 0x00, 0x00, 0x00, 0x00, 0x00, 0x00, 0x00, 0x00, 0x00, 0x00, 0x00, 0x00, 0x00, 0x00, 0x00, 0x00}; /*"创",2*/ static const unsigned char PROGMEM hans_ke1[] = { 0x00, 0x00, 0x00, 0x00, 0x00, 0x00, 0x00, 0x00, 0x00, 0x00, 0x00, 0x00, 0x00, 0x00, 0x00, 0x00, 0x00, 0x00, 0x00, 0x00, 0x00, 0x78, 0x00, 0x00, 0x00, 0x38, 0x00, 0x00, 0x00, 0x28, 0x00, 0x00, 0x00, 0x47, 0x00, 0x00, 0x00, 0x8F, 0x00, 0x00, 0x00, 0x96, 0x00, 0x00, 0x00, 0xAC, 0x00, 0x00, 0x01, 0x7C, 0x00, 0x00, 0x01, 0xD4, 0x00, 0x00, 0x01, 0x68, 0x00, 0x00, 0x00, 0xD9, 0x80, 0x00, 0x02, 0x9F, 0xE0, 0x00, 0x01, 0xFF, 0xE0, 0x00, 0x00, 0x5F, 0xC0, 0x00, 0x00, 0xB6, 0x00, 0x00, 0x07, 0x6E, 0x00, 0x00, 0x00, 0xCC, 0x00, 0x00, 0x00, 0xDF, 0x00, 0x00, 0x00, 0xFF, 0x00, 0x00, 0x00, 0xFF, 0x00, 0x00, 0x00, 0xC0, 0x00, 0x00, 0x00, 0x00, 0x00, 0x00, 0x00, 0x00, 0x00, 0x00, 0x00, 0x00, 0x00, 0x00, 0x00, 0x00, 0x00, 0x00, 0x00, 0x00, 0x00, 0x00, 0x00, 0x00, 0x00, 0x00}; /*"客",3*/ |
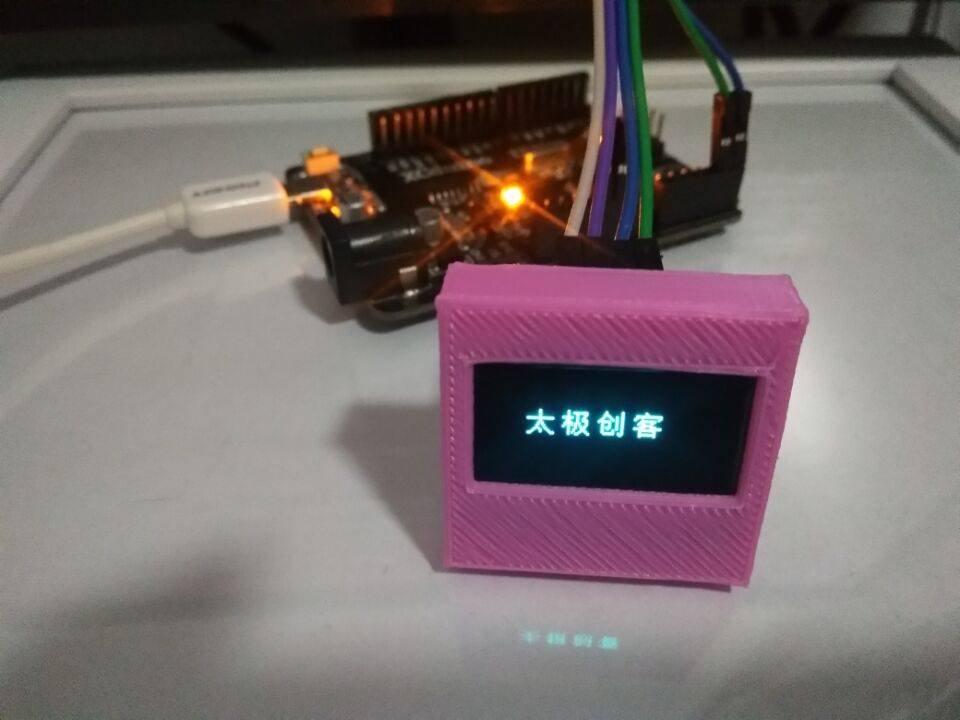
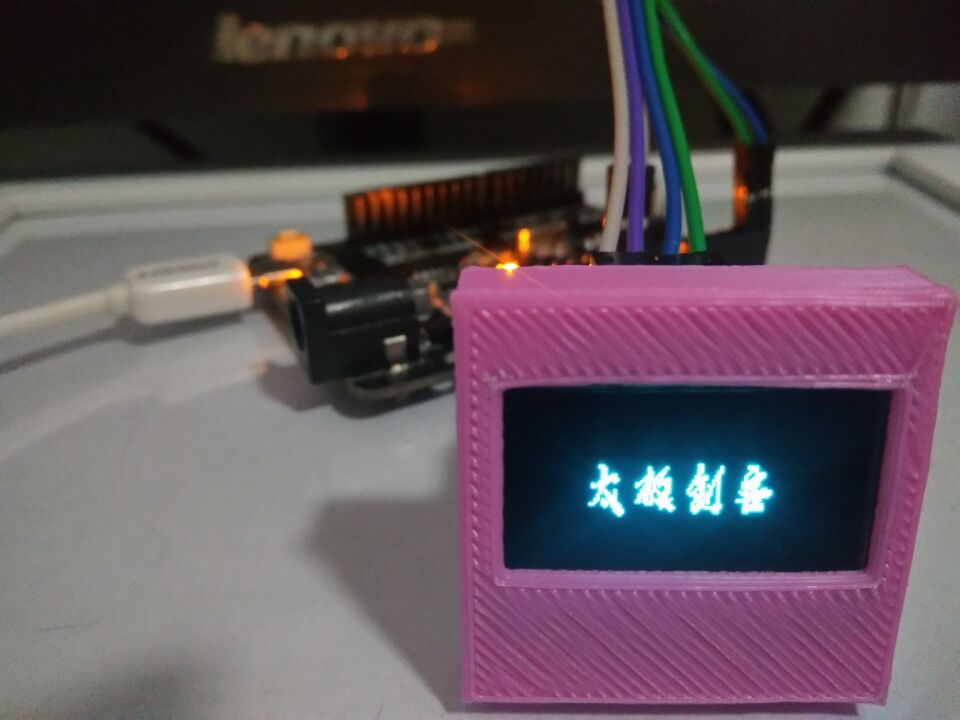
效果演示
3 OLED显示图片
图片的显示需要对图片进行取模操作,再使用drawBitmap()函数对取模生成的数组进行显示,下面介绍如何对图片进行取模操作
图片取模
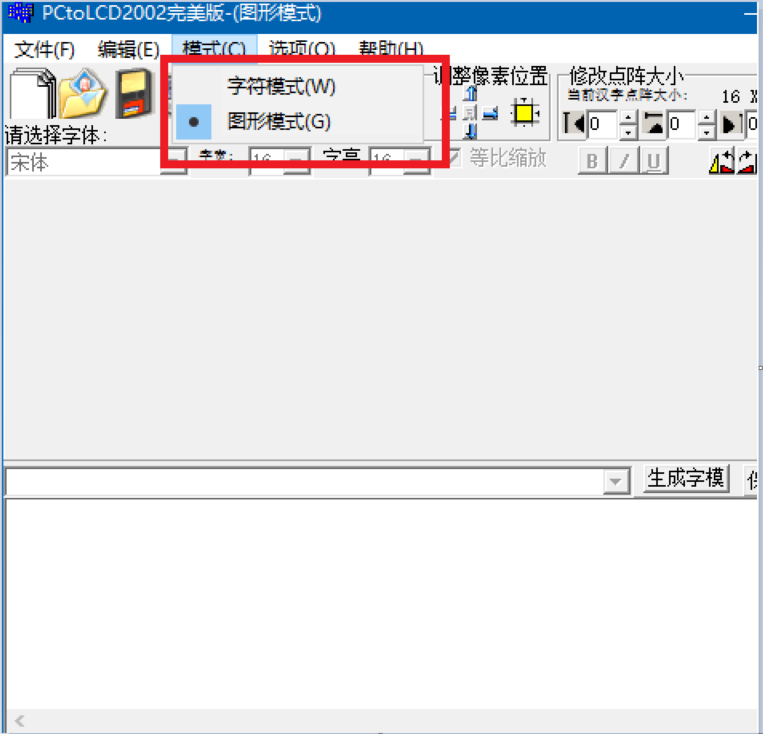
1 打开取模软件,切换到图形模式
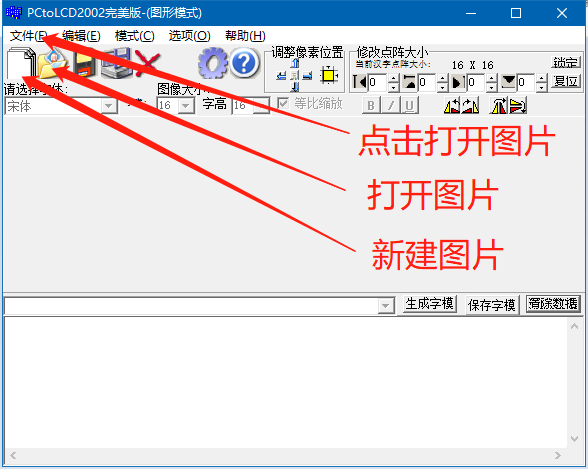
2 打开图片或新建图片
图形模式有三种方法可以处理图片(如下图所示)
A、点击文件->打开,打开现有的BMP单色图片
B、点击打开图片按钮打开现有的BMP单色图片
C、点击新建图片按钮,设置宽度和高度,新建一幅单色BMP图片
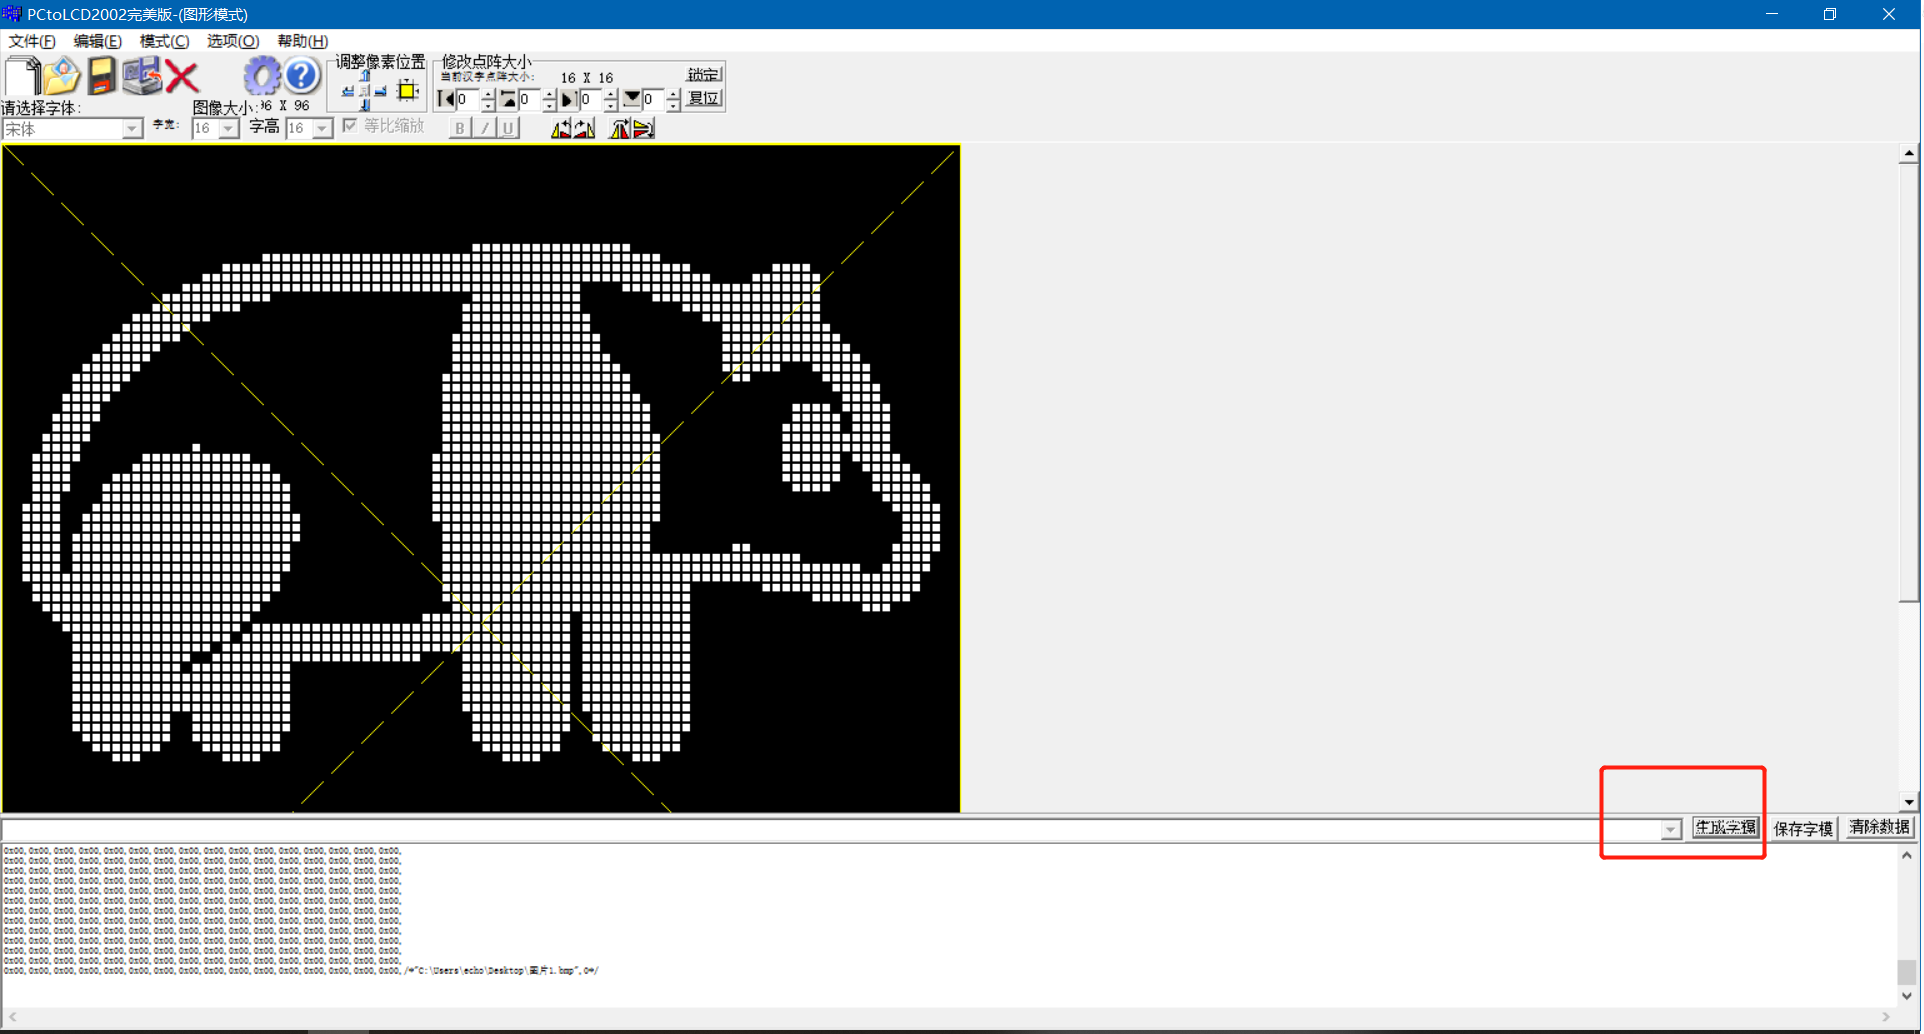
3 打开图片之后,点击生成子模,生成之后需要对生成的数据进行变量赋值和加工,具体格式参考示例程序
电路连接

示例程序
|
1 2 3 4 5 6 7 8 9 10 11 12 13 14 15 16 17 18 19 20 21 22 23 24 25 26 27 28 29 30 31 32 33 34 35 36 37 38 39 40 41 42 43 44 45 46 47 48 49 50 51 52 53 54 55 56 57 58 59 60 61 62 63 64 65 66 67 68 69 70 71 72 73 74 75 76 77 78 79 80 81 82 83 84 85 86 87 88 89 90 91 92 93 94 95 96 97 98 99 100 101 102 103 104 105 106 107 108 109 110 111 112 113 114 115 116 117 118 119 120 121 122 123 124 125 126 127 128 129 |
/********************************************************************** 程序名称/Program name : words_display 团队/Team : 太极创客团队 / Taichi-Maker (www.taichi-maker.com) 作者/Author : Dapenson 日期/Date(YYYYMMDD) : 2020/07/01 程序目的/Purpose : 使用OLED0.96 IIC 12864显示图片 ----------------------------------------------------------------------- 修订历史/Revision History 日期/Date 作者/Author 参考号/Ref 修订说明/Revision Description ----------------------------------------------------------------------- 其它说明: ***********************************************************************/ // 引入IIC通讯所需的Wire库文件 // 教程参考http://www.taichi-maker.com/homepage/reference-index/arduino-library-index/wire-library/ #include <Wire.h> // 引入驱动OLED0.96所需的库 #include <Adafruit_GFX.h> #include <Adafruit_SSD1306.h> #define SCREEN_WIDTH 128 // 设置OLED宽度,单位:像素 #define SCREEN_HEIGHT 64 // 设置OLED高度,单位:像素 // 自定义重置引脚,虽然教程未使用,但却是Adafruit_SSD1306库文件所必需的 #define OLED_RESET 4 Adafruit_SSD1306 display(SCREEN_WIDTH, SCREEN_HEIGHT, &Wire, OLED_RESET); static const unsigned char PROGMEM panda_bmp[] = { 0x00,0x00,0x00,0x00,0x00,0x00,0x00,0x00,0x00,0x00,0x00,0x00,0x00,0x00,0x00,0x00, 0x00,0x00,0x00,0x00,0x00,0x00,0x00,0x00,0x00,0x00,0x00,0x00,0x00,0x00,0x00,0x00, 0x00,0x00,0x00,0x00,0x00,0x00,0x00,0x00,0x00,0x00,0x00,0x00,0x00,0x00,0x00,0x00, 0x00,0x00,0x00,0x00,0x00,0x00,0x00,0x00,0x00,0x00,0x00,0x00,0x00,0x00,0x00,0x00, 0x00,0x00,0x00,0x00,0x00,0x00,0x00,0x00,0x00,0x00,0x00,0x00,0x00,0x00,0x00,0x00, 0x00,0x00,0x00,0x00,0x00,0x00,0x00,0x00,0x00,0x00,0x00,0x00,0x00,0x00,0x00,0x00, 0x00,0x00,0x00,0x00,0x00,0x00,0x00,0x00,0x00,0x00,0x00,0x00,0x00,0x00,0x00,0x00, 0x00,0x00,0x00,0x00,0x00,0x00,0x00,0x00,0x00,0x00,0x00,0x00,0x00,0x00,0x00,0x00, 0x00,0x00,0x00,0x00,0x00,0x00,0x00,0x00,0x00,0x00,0x00,0x00,0x00,0x00,0x00,0x00, 0x00,0x00,0x00,0x00,0x00,0x00,0x00,0x00,0x00,0x00,0x00,0x00,0x00,0x00,0x00,0x00, 0x00,0x00,0x00,0x00,0x00,0x00,0x00,0x00,0x00,0x00,0x00,0x00,0x00,0x00,0x00,0x00, 0x00,0x00,0x00,0x00,0x00,0x00,0x00,0x00,0x00,0x00,0x00,0x00,0x00,0x00,0x00,0x00, 0x00,0x00,0x00,0x00,0x00,0x00,0x00,0x00,0x00,0x00,0x00,0x00,0x00,0x00,0x00,0x00, 0x00,0x00,0x00,0x00,0x00,0x00,0x00,0x00,0x00,0x00,0x00,0x00,0x00,0x00,0x00,0x00, 0x00,0x00,0x00,0x00,0x00,0x00,0x00,0x00,0x00,0x00,0x00,0x00,0x00,0x00,0x00,0x00, 0x00,0x00,0x00,0x00,0x00,0x00,0x00,0x00,0x00,0x00,0x00,0x00,0x00,0x00,0x00,0x00, 0x00,0x01,0xFF,0xFE,0x00,0x00,0x00,0x00,0x00,0x00,0x00,0x3F,0xFF,0xFF,0xFF,0xFF, 0xC0,0x00,0x00,0x00,0x00,0x00,0x03,0xFF,0xFF,0xFF,0xFF,0xFF,0xF8,0x07,0x80,0x00, 0x00,0x00,0x0F,0xFF,0xFF,0xFF,0xFF,0xFF,0xFE,0x1F,0xC0,0x00,0x00,0x00,0x3F,0xFF, 0xFF,0xFF,0xFF,0xC3,0xFF,0xFF,0xC0,0x00,0x00,0x00,0xFF,0xE0,0x00,0x01,0xFF,0xC0, 0x7F,0xFF,0xC0,0x00,0x00,0x01,0xFF,0x00,0x00,0x03,0xFF,0xC0,0x0F,0xFF,0xC0,0x00, 0x00,0x07,0xF8,0x00,0x00,0x03,0xFF,0xE0,0x03,0xFF,0xC0,0x00,0x00,0x0F,0xE0,0x00, 0x00,0x03,0xFF,0xE0,0x00,0xFF,0xE0,0x00,0x00,0x1F,0xC0,0x00,0x00,0x07,0xFF,0xF0, 0x00,0xFF,0xF0,0x00,0x00,0x3F,0x00,0x00,0x00,0x07,0xFF,0xF0,0x00,0xFF,0xF8,0x00, 0x00,0x7E,0x00,0x00,0x00,0x07,0xFF,0xF8,0x00,0xFF,0xFC,0x00,0x00,0xFC,0x00,0x00, 0x00,0x07,0xFF,0xFC,0x00,0xFC,0x7E,0x00,0x01,0xF8,0x00,0x00,0x00,0x0F,0xFF,0xFE, 0x00,0x60,0x3E,0x00,0x01,0xF0,0x00,0x00,0x00,0x0F,0xFF,0xFE,0x00,0x00,0x1F,0x00, 0x03,0xE0,0x00,0x00,0x00,0x0F,0xFF,0xFF,0x00,0x00,0x0F,0x00,0x03,0xC0,0x00,0x00, 0x00,0x0F,0xFF,0xFF,0x80,0x01,0xEF,0x80,0x07,0xC0,0x00,0x00,0x00,0x0F,0xFF,0xFF, 0x80,0x01,0xF7,0x80,0x07,0x80,0x00,0x00,0x00,0x0F,0xFF,0xFF,0x80,0x03,0xF7,0x80, 0x0F,0x80,0x00,0x00,0x00,0x0F,0xFF,0xFF,0xC0,0x03,0xFF,0x80,0x0F,0x00,0x10,0x00, 0x00,0x0F,0xFF,0xFF,0xC0,0x03,0xFF,0x80,0x1F,0x03,0xFF,0x80,0x00,0x1F,0xFF,0xFF, 0xC0,0x03,0xF7,0xC0,0x1E,0x07,0xFF,0xE0,0x00,0x1F,0xFF,0xFF,0xC0,0x03,0xF3,0xE0, 0x1E,0x1F,0xFF,0xF0,0x00,0x1F,0xFF,0xFF,0xC0,0x03,0xF1,0xF0,0x1E,0x3F,0xFF,0xF8, 0x00,0x1F,0xFF,0xFF,0xC0,0x01,0xE1,0xF8,0x1C,0x3F,0xFF,0xF8,0x00,0x1F,0xFF,0xFF, 0xC0,0x00,0x00,0xF8,0x3C,0x7F,0xFF,0xF8,0x00,0x1F,0xFF,0xFF,0xC0,0x00,0x00,0x7C, 0x3C,0xFF,0xFF,0xFC,0x00,0x1F,0xFF,0xFF,0xC0,0x00,0x00,0x3C,0x3C,0xFF,0xFF,0xFC, 0x00,0x0F,0xFF,0xFF,0x80,0x00,0x00,0x3C,0x3D,0xFF,0xFF,0xFC,0x00,0x0F,0xFF,0xFF, 0x80,0x00,0x00,0x3C,0x3D,0xFF,0xFF,0xF8,0x00,0x0F,0xFF,0xFF,0x80,0x60,0x00,0x7C, 0x3D,0xFF,0xFF,0xF8,0x00,0x0F,0xFF,0xFF,0xFF,0xFF,0x00,0x78,0x3D,0xFF,0xFF,0xF8, 0x00,0x0F,0xFF,0xFF,0xFF,0xFF,0xFC,0xF8,0x3F,0xFF,0xFF,0xF0,0x00,0x0F,0xFF,0xFF, 0xFF,0xFF,0xFF,0xF0,0x1F,0xFF,0xFF,0xF0,0x00,0x0F,0xFF,0xFF,0xF8,0x0F,0xFF,0xF0, 0x1F,0xFF,0xFF,0xE0,0x00,0x0F,0xFF,0xFF,0xF8,0x00,0x7F,0xE0,0x0F,0xFF,0xFF,0xC0, 0x00,0x07,0xFF,0xFF,0xF8,0x00,0x03,0x80,0x07,0xFF,0xFF,0x80,0x00,0x3F,0xFF,0xBF, 0xF8,0x00,0x00,0x00,0x03,0xFF,0xFF,0x7F,0xFF,0xFF,0xFF,0xBF,0xF8,0x00,0x00,0x00, 0x01,0xFF,0xFE,0xFF,0xFF,0xFF,0xFF,0xBF,0xF8,0x00,0x00,0x00,0x01,0xFF,0xFB,0xFF, 0xFF,0xFF,0xFF,0xBF,0xF8,0x00,0x00,0x00,0x01,0xFF,0xE7,0xFF,0xFF,0xC3,0xFF,0xBF, 0xF8,0x00,0x00,0x00,0x01,0xFF,0xDF,0xF8,0x00,0x03,0xFF,0xBF,0xF8,0x00,0x00,0x00, 0x01,0xFF,0xFF,0xF8,0x00,0x03,0xFF,0xBF,0xF8,0x00,0x00,0x00,0x01,0xFF,0xFF,0xF8, 0x00,0x03,0xFF,0xBF,0xF8,0x00,0x00,0x00,0x01,0xFF,0xFF,0xF8,0x00,0x03,0xFF,0xBF, 0xF8,0x00,0x00,0x00,0x01,0xFF,0xFF,0xF8,0x00,0x03,0xFF,0xBF,0xF8,0x00,0x00,0x00, 0x01,0xFF,0x9F,0xF8,0x00,0x01,0xFF,0x9F,0xF8,0x00,0x00,0x00,0x01,0xFF,0x9F,0xF8, 0x00,0x01,0xFF,0x9F,0xF8,0x00,0x00,0x00,0x00,0xFF,0x9F,0xF0,0x00,0x01,0xFF,0x1F, 0xF0,0x00,0x00,0x00,0x00,0x7F,0x0F,0xF0,0x00,0x00,0xFF,0x0F,0xF0,0x00,0x00,0x00, 0x00,0x1C,0x03,0xC0,0x00,0x00,0x3C,0x01,0xC0,0x00,0x00,0x00,0x00,0x00,0x00,0x00, 0x00,0x00,0x00,0x00,0x00,0x00,0x00,0x00,0x00,0x00,0x00,0x00,0x00,0x00,0x00,0x00, 0x00,0x00,0x00,0x00,0x00,0x00,0x00,0x00,0x00,0x00,0x00,0x00,0x00,0x00,0x00,0x00, 0x00,0x00,0x00,0x00,0x00,0x00,0x00,0x00,0x00,0x00,0x00,0x00,0x00,0x00,0x00,0x00, 0x00,0x00,0x00,0x00,0x00,0x00,0x00,0x00,0x00,0x00,0x00,0x00,0x00,0x00,0x00,0x00, 0x00,0x00,0x00,0x00,0x00,0x00,0x00,0x00,0x00,0x00,0x00,0x00,0x00,0x00,0x00,0x00, 0x00,0x00,0x00,0x00,0x00,0x00,0x00,0x00,0x00,0x00,0x00,0x00,0x00,0x00,0x00,0x00, 0x00,0x00,0x00,0x00,0x00,0x00,0x00,0x00,0x00,0x00,0x00,0x00,0x00,0x00,0x00,0x00, 0x00,0x00,0x00,0x00,0x00,0x00,0x00,0x00,0x00,0x00,0x00,0x00,0x00,0x00,0x00,0x00, 0x00,0x00,0x00,0x00,0x00,0x00,0x00,0x00,0x00,0x00,0x00,0x00,0x00,0x00,0x00,0x00, 0x00,0x00,0x00,0x00,0x00,0x00,0x00,0x00,0x00,0x00,0x00,0x00,0x00,0x00,0x00,0x00, 0x00,0x00,0x00,0x00,0x00,0x00,0x00,0x00,0x00,0x00,0x00,0x00,0x00,0x00,0x00,0x00, 0x00,0x00,0x00,0x00,0x00,0x00,0x00,0x00,0x00,0x00,0x00,0x00,0x00,0x00,0x00,0x00, 0x00,0x00,0x00,0x00,0x00,0x00,0x00,0x00,0x00,0x00,0x00,0x00,0x00,0x00,0x00,0x00, 0x00,0x00,0x00,0x00,0x00,0x00,0x00,0x00,0x00,0x00,0x00,0x00,0x00,0x00,0x00,0x00, 0x00,0x00,0x00,0x00,0x00,0x00,0x00,0x00,0x00,0x00,0x00,0x00,0x00,0x00,0x00,0x00, 0x00,0x00,0x00,0x00,0x00,0x00,0x00,0x00,0x00,0x00,0x00,0x00,0x00,0x00,0x00,0x00, 0x00,0x00,0x00,0x00,0x00,0x00,0x00,0x00,0x00,0x00,0x00,0x00,0x00,0x00,0x00,0x00}; void setup() { // 初始化OLED并设置其IIC地址为 0x3C display.begin(SSD1306_SWITCHCAPVCC, 0x3C); } void loop() { bmp_display(); } void bmp_display(void) { // 显示前清屏 display.clearDisplay(); // 将图片显示在中心位置 display.drawBitmap(0,0,panda_bmp, 96, 96, 1); // 将内容显示到屏幕 display.display(); delay(1000); } |
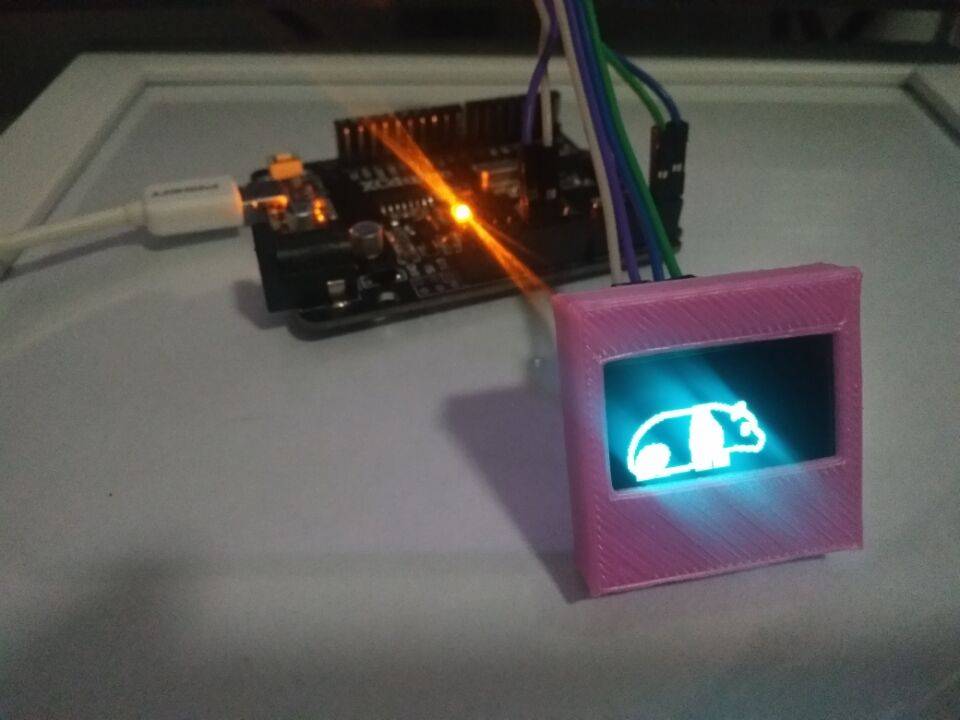
效果演示
相关资源
1 取模软件PCtoLCD2002下载地址
2 IIC设备扫描获取地址
当您不确定您的屏幕IIC地址时,可以使用以下示例程序进行IIC地址获取
将您的设备连接好之后,烧录以下示例程序并打开串口监视器即可获取当前设备的IIC地址
|
1 2 3 4 5 6 7 8 9 10 11 12 13 14 15 16 17 18 19 20 21 22 23 24 25 26 27 28 29 30 31 32 33 34 35 36 37 38 39 40 41 42 43 44 45 46 47 |
#include <Wire.h> void setup() { Wire.begin(); Serial.begin(9600); while (!Serial); //太极创客 www.taichi-maker.com Serial.println("\nI2C Scanner"); } void loop() { int nDevices = 0; Serial.println("Scanning..."); for (byte address = 1; address < 127; ++address) { // The i2c_scanner uses the return value of // the Write.endTransmisstion to see if // a device did acknowledge to the address. Wire.beginTransmission(address); byte error = Wire.endTransmission(); if (error == 0) { Serial.print("I2C device found at address 0x"); if (address < 16) { Serial.print("0"); } Serial.print(address, HEX); Serial.println(" !"); ++nDevices; } else if (error == 4) { Serial.print("Unknown error at address 0x"); if (address < 16) { Serial.print("0"); } Serial.println(address, HEX); } } if (nDevices == 0) { Serial.println("No I2C devices found\n"); } else { Serial.println("done\n"); } delay(5000); // Wait 5 seconds for next scan } |